€65.25
Priemerné hodnotenie:0/5(0x)
Vlastnosti a parametre výrobku
Skúsenosti užívateľov
Otázky a odpovede
Dokumentácia
Popis
Vlastnosti a parametre výrobku
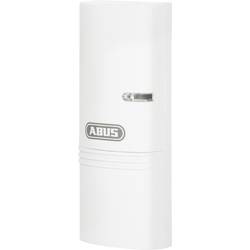
| Komponenty alarmu | Bezdrôtový senzor vibrácií |
|---|---|
| Ochrana pred sabotážou | Áno |
| Kategória výrobku | Rozšírenie bezdrôtového alarmu |
| Napájanie | Na batérie |
| Séria (domáca technika) | ABUS Smartvest ABUS Smart Security World |
| Frekvencia | 868 MHz |
Skúsenosti a názory zákazníkov
- Skúsenosti užívateľov nie sú k dispozícii.
Otázky užívateľov
- Užívatelia k tomuto výrobku zatiaľ nemali žiadne otázky.
Dokumentácia
Podmienky používania dokumentácie
abus.com Eine alternative Inbetriebnahme sowie detaillierte Informationen findest Du in der Bedienungsanleitung auf abus.com oder in der App.
Vous trouverez une solution alternative pour la mise en service, ainsi que des informations détaillées dans le manuel d’utilisateur sur abus.com ou via notre application.
Een alternatieve ingebruikname en gedetailleerde informatie vind je in de gebruikershandleiding die op abus.com en in de app.
Per informazioni su una messa in funzione alternativa o sui dettagli del prodotto, consultare le istruzioni per l‘uso disponibili all‘indirizzo abus.com o nella app.
You can find an alternative start-up process and detailed information in the user manual at abus.com or in the app.
Alternativ idrifttagning samt detaljerede oplysninger finder du i betjeningsvejledningen på abus.com eller i appen.
En el manual de instrucciones disponible para descargar en abus.com y en la App podrás encontrar una puesta en funcionamiento alternativa, así como información más detallada.
Alternativ idrifttagning samt detaljerad information finns i bruksanvisningen på abus.com och i appen.
FUEM35000A
QUICK GUIDE
ABUS Security-Center – Linker Kreuthweg 586444 Affing – Germany – abus.com
2
6
4
1
3
Gegebenenfalls App PIN (default „123456“) eingeben und bestätigen.
If required enter App PIN („123456” by default) and confirm.
Wähle das Einstellungssymbol an.
Select the settings button.Wähle gegebenenfalls die gewünschte Zentrale.
Schritte 1 und 2 entfallen, falls Du in der App den automatischen Login aktiviert hast.
If necessary, select the desired panel.
Steps 1 and 2 are not necessary, if the automatic login has been activated.
1. Gib das Passwort ein (default „123456“).
2. Wähle „Einstellungen entsperren“.
1. Enter the password („123456“ by default).
2. Select „Unlock Settings”.
App öffnen Start App EinstellungenSettingsEinstellungen Settings Auswahl Selection Erschütterungs-melder Vibration-Detector 21
5
1. Wähle „Komponenten“.
2. Wähle das Plus-Symbol in der neu aufgehenden Ansicht.
1.
Select „Components“.2. Select the plus symbol in the new screen.
Komponenten Components 1
1. Wähle „Erschütterungsmelder“.
1. Select „Vibration Detector“.
8
10
1. Wähle „Einlernen“ 2. Ziehe danach die Plastikfolie vom Batteriefach ab 1. Select „Pair“ 2. Remove the plastic tab from the Battery-case Montage Installation Einlernen Pair 7
1. Gib einen Namen ein.
2. Wähle den Raum in dem sich der Erschütterungsmelder befindet.
3. Wähle „Weiter“.
1. Enter a name.
2. Select the room in which the vibration detector is installed.
3. Select „Next”.
Name Name 1
2
3
9
Verbindung wird hergestellt und die Komponentenansicht wird angezeigt.
Connection is initiated and the component screen is displayed.
Verbindung Connection Option 1: Befestigung mit Klebepads.
Option 2: Befestigung mit 2 Schrauben.
Option 1: Fix with adhsive pads.
Option 2 Fix with 2 Screws.
11
Konfiguration Configuration Hinweis: Änderungen werden erst mit der nächsten Sensor-Auslösung übernommen!
Note: Changes are processed with next sensor trigger only!
12
Allgemeine Montagehinweise – Optimaler Einsatzort des Funk-Erschütterungsmelders ist an Gegenständen, die nicht bewegt werden sollen (Tresor, wertvolle Gegenstände) oder an Stellen, die nicht durchbrochen werden sollen (Holztüren, Glaswände, Gipswände).
– Befestige den Melder probeweise mit doppelseitigem Klebeband und löse zum Testen einen Alarm aus. Wurde dieser von der Anlage nicht empfangen, teste den Melder an einer anderen Stelle Bringe den Melder nicht an folgenden Stellen an: – In Bodennähe – In der Nähe großer Metallstrukturen – In der Nähe von Netzleitungen oder Gasleitungen – In der Nähe von elektrischen Geräten oder Funkgeräten – An Elementen die sich von selbst bewegen oder kopfüber Mounting instructions – The Vibration detector is recommended to be mounted on objects that shall not be moved (Vault, Valuables) or on places that shall not be broken (wooden doors, Glass-walls, cement-walls) – Start testing the detector by fixing it with adhesive pads and trigger an alarm. In case no trigger was sent to the Alarm Panel, start testing the detector on another place.
Do not fix the detector on the following places: – Near the ground – Close to metal structures – Close to Power lines or Gas pipes – Close to electrical or radio devices – Upside down or on elements that move by itself.
Hinweise Notes Führe Schritte 1 – 4 durch, wähle Komponenten und dann den Erschütterungsmelder Wähle die Sensorempfindlichkeit Wähle die Montage-ausrichtung Wähle die Auslöseart Trigger / nur bei Status aktiv, intern aktiv.
24h / Sensor löst immer Alarm aus Follow Steps 1 – 4, select „Components“ and the Vibrationdetector Choose the Sensor sensitivity level Choose the mounting-alignment Choose the Detection mode Trigger / only at status armed, internal armed 24h / Sensor triggers alarm any time.

